August 31, 2010

Canning Tomato Sauce II

Saturday I was really looking forward to canning tomato sauce: the weather was unseasonably cool, meaning that a vat of boiling water didn't render my kitchen a sweltering sauna.   There was that nip in the air that reminds us that the tomatoes that are so prolific right now won't be available six months from now and opening one of these jars of packed-at-its-peak tomato sauce will be a welcome reminder of summer's bounty.  As I began filling jars with tomato sauce after a good three hours of boiling it down, though, I wasn't exactly looking forward to repeating the whole process the next day with the remaining tomatoes.  But making two separate batches has it's advantages.  The second day I was familiar enough with the process that I didn't have to reread the directions over and over.  Saturday's experience also lent the foresight to plan a dinner that did not require use of the stove top on Sunday. And making two separate batches means that the finished result can serve two separate purposes.

Saturday's batch was a simple tomato sauce: tomatoes, lemon juice and salt.  I will be able to use it in any recipe calling for "one 14 oz can of tomato sauce."  (Yes, I know that a pint is 16 ounces, but for some reason commercial tomato sauce is usually available in 14 ounce cans, so recipes are usually written for that amount.)

Being a tinkerer, Sunday I did a seasoned tomato sauce.  Don't worry, it was from an approved recipe in the Ball Blue Book Guide to Preserving via Home and Garden Dailies.  Seasoned with garlic, onion, oregano, bay leaf, salt, pepper and just enough red pepper flakes to make it zesty, this is the perfect sauce to pour over browned ground beef and serve over spaghetti.

oOo

Twenty pounds of tomatoes yielded 12 pints of tomato sauce (seven of the plain batch and five of the  seasoned batch, which I cooked down longer for a thicker finished product).  Was it worth it?  Since I already had the jars and rings, and the lids were on sale for $2 (lids should be brand new to ensure a proper seal), my total output was $22.  That's less than $2 per pint.  Sure, I could probably find generic tomato sauce in the supermarket cheaper, but I like to think that the quality of a homemade sauce is closer to that of, say, Muir Glen Organics Tomatoes, which I always feel like I am paying an arm and a leg for.  But when you experience all the time and the sheer bulk of tomatoes (almost a full pound per pint of finished sauce) that go into a can of tomato sauce, the price you pay for good quality seems justified.

And in midwinter, be assured I'm not going to waste any of these jars of sauce on some Super Saver Value-Pack ground beef.  No, this is quality sauce, and anything that accompanies this sauce in a meal is going to have to 'step up to the plate' so to speak. Something about making my own, about knowing from whence my food came, about putting so much time into a sauce, inspires me to prepare a meal to be savored.  And for me, savoring a meal means savoring life.

oOo

Food safety is serious business.  Because it is so important to use an approved recipe when canning, at this time I have opted not to post "adapted" versions.  Links to the recipes I use are available in the post.  If you haven't canned before, and are considering it, but you aren't committed enough to the idea to buy a book,  The National Center for Food Preservation's website has all the information that you'll need, and it is kept up-to-date.  Also, while it would feel pleasantly quaint to use Grandma's recipe for Tomato Sauce, but I must advise against it.  This is an area where you want up-to-date resources.

August 28, 2010

Canning Tomato Sauce


Step 1:  Find a dish soap that you enjoy the fragrance of...

Yes, that should be the first step to all canning recipes, because at the end of the day when ginger-vinegar essence of chutney is just a memory, that Ivory dish soap will be fresh in your mind. 

oOo


ALWAYS use canning recipes from reputable sources.  The National Center for Home Food Preservation is a good online resource for safe canning.  (Their recipe for Standard Tomato Sauce is what I used today.)  I've made a handful of recipes from their site all with more than satisfactory results. You know I like to tinker and adjust recipes, but this is NOT the time to do it.  ALWAYS stick to the recipe when canning to ensure a safe end result. A safe product relies on the right acid and/or sugar  level, so stick with commercially packaged lemon juice or the specific type of vinegar called for in the recipe, and do not reduce or exchange the quantities of sweeteners or fruits. 

oOo

Honestly, I thought I was going to use "having an active toddler" as a reasonable excuse not to do any canning this summer.   I mean millions of people live as if there's some sort of outlet just miles from their home that contains virtually every imaginable food for purchase...  But I've read the literature, I've watched the documentaries, I've tasted and I've seen, and it's just gotten in my blood: this sense that we must 'put up' preserves for winter, this joyful satisfaction in investing in the local food system.  And today it got the better of me; I came home from the farmer's market with a 20-lb box of San Marzano tomatoes that my former biology teacher had grown on his one-acre farm in Durham. 

Chicoans, have you visited his stand at the Saturday Market?  I used to avoid it, simply because he and I didn't see eye-to-eye on so many issues so long ago.  I hated biology, but botany's kinda cool.  And fruits and vegetables, that's botany, so maybe we'll find some common ground after-all.  I do enjoy his stand, because he seems to have things that other stands don't.  He has a good selection of herbs, for instance, and long swirly summer squash. Last fall and winter he sold dried fruits and dried chiles.  And he was the first vendor to have pears this year. Today he had some beautiful figs, all sorts of peppers, and about four or five varieties of tomato.  I really appreciate his passion and knowledge about the varieties that he grows.  He seems like an okay guy after all.

I had done my research online:  21 pounds of tomatoes should yield 9 pints of thin tomato sauce.  Twenty eight pounds would yield 9 pints of a thick tomato sauce. I had considered buying 25 pounds, but the vendor already had the tomatoes measured in 20-pound quantities, and twenty pounds is a large box, so I got 20 pounds. 

This would be an appropriate use for your largest stockpot, if it hadn't been sacrificed years ago in a cross-country move...  So I used my large spaghetti pot. I scrubbed it out, because the last time I made yogurt the milk scum had kind of browned and hardened on to the bottom of the pan.  I'd washed it a couple times since then, but man was that stuff stuck on!  For canning everything must be super-clean, so I scrubbed and scrubbed and finally it was shiny and clean.  

I started chopping tomatoes.   The recipe I was referencing advised that I should chop up about a pound of tomatoes and get them boiling in the pot, and then continue quartering and adding tomatoes at a rate so as to allow the pot to continue boiling.  Simple enough. I liken this step to knitting.  I don't knit personally, but a lot of people seem to find the repetitive motion somewhat therapeutic. Otherwise, why would one spend a week or more making something they could go buy at the outlet down the street?  So it is with chopping tomatoes and stirring pots of steamy vegetable mixtures.  It's relaxing.  After about a half hour or so of this therapy, the pot was bubbling about an inch from the rim.  It was time to let it boil and reduce to the desired consistency.  Time for my second round of dishes: washing the cutting board and knife, the glass jars and lids, and for good measure, all the parts of the fruit and vegetable strainer attachment to my KitchenAid mixer.

Then time to wait, and stir or crush the tomatoes occasionally. And wait.  And wait.  I really hadn't expected it to be over two hours of cooking.  Finally the tomatoes had reduced by about a third.  Oh, and did I mention that I had only used half of my 20-pound box of tomatoes?  Meaning that I am anticipating a repeat performance tomorrow. At this point I assembled the fruit and vegetable strainer attachment.  Then I searched my cupboards for a big vessel to catch the sauce.  Using a ladle, I scooped the cooked tomatoes into the food tray, and pushed them into the grinder (thanking God all the while for my mother-in-law who so kindly gave me the attachment.  If you've ever strained berries or apricots for jam by hand, you know what I am talking about!)  A thin puree came out the other end. I strained all 4 1/2 quarts of the tomatoes and determined that more reduction was necessary.  I poured the hot strained tomato sauce back into the original (washed) pot and let it bubble away another hour while I washed all the KitchenAid parts, heated the canning kettle and got started making dinner.  

I reduced the puree to what ended up being seven pints (three and a half quarts).  The consistency would have been thicker and more satisfactory if I had let to boil longer, but my patience was getting thin and I needed that burner to finish making dinner.  At this point the rest is easy; well, one could get some pretty significant burns, but in terms of clean-up, all one has left to wash is the stockpot, ladle, tongs and spoon rest. 

This is where having the right canning equipment is imperative.  A jar lifter, a magnetic lid wand, a wide-mouth funnel and long heatproof gloves are all a worthwhile investment if you plan to can more than once. And it is at this point in the process that I always wonder why I've failed to make that investment.  I use some good tongs, a small funnel and rubber gloves and I get through it:  filling hot jars with a tablespoon of commercially prepared lemon juice, a teaspoon of canning salt and finally the tomato sauce. Then I carefully place the seven hot pints into the hot water canner.

One last load of dishes and the work is done.  Yes, once the water is boiling again, the jars need to be timed to bathe for 35 minutes and then removed (without scalding oneself), but that's hardly any work at all...

Photo credit:  Jason Powers Photography 

August 27, 2010

Nutritional Philosophy + Mango Salsa

Do you give much thought to your nutritional philosophy?

A while back a friend of mine commented that he'd rather his kids be picky eaters than "little pigs who eat everything."  His point was that he'd rather his kids develop a nutritional philosophy and figure out what they like and don't like and why.   So often we complain about picky eaters.  I found my friend's sentiment so refreshing that it has stuck with me for a good ten years. Of course, it probably helped that this friend and I shared a mutual disdain for mayonnaise and that he made excellent tri-tip.
(By the way, my practice is not to use names when I talk about friends, but if you catch me writing about you, and leave a comment on that post, I'll give you extra credit.)

Here's the rundown on my current Nutritional Philosophy.  I hope you feel no pressure to share my beliefs about food, because frankly, some of them may be unfounded.  I just want to be clear, so that you know what to expect from me.

I really love the loca-vore mentality.  (Isn't it funny that spellcheck doesn't recognize that word?  Hasn't it been in the vernacular for, what, five years?)  After reading Animal, Vegetable, Miracle: A Year of Food Life (P.S.) and The Omnivore's Dilemma: A Natural History of Four Meals, our household was about 70% locavore.  We bought almost all of our produce and eggs at the farmers market.  All our beef was from Chaffin Orchards in Oroville.  I craved Shredded Pork six months before I found the right cut locally.  The main things we ate that came from more than about 100 miles away were coffee, sugar, flours, pastas, breakfast cereals, dairy products and the occasional yellow onion or avocado. (Isn't it odd that Glenn County has so many dairies, and yet, the most 'local' milk available in our area in from Marin County?  It's wonderful stuff, by the way, and we used it exclusively for at least a few months, but...

But you know what?  I missed cilantro. It has such a short growing season here that I suffered through an entire summer with no 'perfect' homemade salsa.  (Cilantro is what makes it perfect for me.)

Then our food budget got tighter.  And, yes, I do believe that it is less expensive for society in the long run to rely on local food systems, but we had to make some compromises.   Especially after I burned two $16 pasture-raised chickens in the course of a month.

And I missed shrimp.  And salmon.  And mango.

So after about a year, we made some adjustments:

I still buy most of my produce at the Farmer's Market, because I really value the agricultural land that it supports, and I value the farmers who make a living from the land. I value the security of knowing where my food comes from and that it is less likely to be tainted with salmonella than all that stuff in the grocery store that goes through essentially the same processing plants as all the stuff in all the other grocery stores.  That said, if something is not available locally, I don't feel guilty about buying it.

I prefer organic milk, but if I find that I must buy non-organic, I make sure to choose the stuff without rBST.  I understand that the living conditions of those cows that provide the national brand organic milk probably aren't much better than the conventional cows, but still, I buy organic when I can.  And I don't buy ultra-pastuerized.  I like Tillamook Cheese.  It's not organic, but it is from Oregon and I think they do a good job of knowing where their milk comes from.  I imagine farmers in the co-operative get compensated more fairly than those whose milk is purchased to make generic brands of cheese.

In recipes calling for sugar, I use organic evaporated cane juice.  Oddly, I use regular old brown sugar in recipes calling from brown sugar.  I buy local honey either at the farmer's market or at the natural foods store, and well, sometimes from the bulk section at Win-co.  I don't keep very much on hand, because it seems to disappear fast.

I buy eggs from Chris' Egg Farm at the Farmer's Market.  Every so often, I end up buying conventional eggs at the grocery store, and I am getting past the feeling that I am poisoning my family with them, but I don't think I will ever trust them. Besides, Farmer Chris is very entertaining.

There are a lot of rice producers locally, but sometimes I buy jasmine rice or sushi rice at Trader Joe's.

I prefer fish over meat.  Seafood obviously isn't a local food in inland California, but that's okay with me.  Meat is a difficult thing for me.  I don't buy it at big grocer's.  Well, I have purchased it at Costco, but I prefer local butchers, even if the meat isn't sourced locally.  And I have been known to pick up a package of bacon at Trader Joe's. In an ideal world, I'd feed my family only locally raised, grass-finished beef and locally raised chickens and pork.

Speaking of Trader Joe's, after much thought, I've decided that I like that place.  Yes, they are highly secretive about some of their sourcing and management.  Yes, their pre-packaged produce isn't very 'green,' but they've raised the culinary awareness of many Americans, made organic products more accessible to us, and you can trust that nothing in their store has artificial flavorings or preservatives.

Well, I think that covers my Nutritional Philosophy, at least regarding food sources. What is your nutritional philosophy?

Mango Salsa
I learned this recipe from my father-in-law.  He serves it over carne asada in corn tortillas.  You could serve it with chips. 

1 white onion
6 poblano peppers
6 firm-ripe mangoes, or 1 container (12 oz ?) mango chunks from the pre-packaged produce section
large handful of cilantro
salt and lime juice to taste.

Slice onion into 1/2 inch rings. Leave rings intact and grill over medium-high heat to soften and just barely char.  Char peppers over grill.  Let vegetables cool.

Remove skin and seeds from peppers.  Chop peppers and onions into a 1/2 inch dice. Chop mango into 3/4 inch dice.  Chop cilantro.  Combine ingredients.  Season with salt and lime juice.  Let flavors marry 15 minutes or so before serving.


oOo
And for those of keeping score at home:  My goal was to make dinner five nights in a row this week, but  tonight we didn't do dinner at home.  We went to a friend's house instead.  And that's ok with me!  Tomorrow night, though, Chiles Rellenos!


August 26, 2010

Michael Chiarello's Slow Cooked Pork

Serving real homemade family meals every night this week:  Four days down. One to go.

Monday:  Pork Tacos with Tomato-Peach Salsa
Tuesday:  B.L.T Salad
Wednesday:  Grilled Chicken with Chimicurri Sauce over ciabatta bread
Thursday:  Ham Pea Pasta with Roasted Patty Pan Squash

Loyal readers know that last week I was on a bit of a sweet stuff kick and I got out of the habit of making dinner.  Apparently this week, I am on a pork kick.

Making dinner every night gets a bit tiresome, doesn't it?  One thing that really helps me is making things ahead of time or making double batches so that we can eat some and freeze the rest, thereby putting dinner on the table with minimal effort a week or two later.  Planning a menu for the week helps tremendously as well, because when I get home in the evening I can be on auto-pilot, instead of trying to figure things out when I am tired and hungry.  I can also look ahead and get things started a day or two (or more) ahead of time.

This Monday for instance, to make tacos, I thawed some shredded pork that I had prepared and frozen in small batches a couple months ago.  That might seem like a long time, but if frozen properly (cooled quickly and wrapped well), most things will keep with no loss of quality for one to three months.  I served the warmed pork in warm tortillas topped with Tomato-Peach salsa, but any good pico de gallo type sauce would work.

Like a lot of dishes, this Slow Cooked Pork takes a good deal of work upfront, but once it is done, you can store reasonable portions in appropriately-sized freezer bags and have the beginnings of a delicious meal accessible in the freezer. Just transfer the freezer bag to the fridge the night before you plan to use the meat.  This recipe is easily double-able, just be sure to use a large enough pan to catch the juices.  This pork cooks overnight (or all day) and fills the house with that wonderful pork smell. Be forewarned, it might not taste as perfect as it smells, but it is a great thing to have on hand as the protein element of quick weeknight meal.  The garlicky rub on the outside crisps to a sweet, mildly spiced crust. The pork within is tender and shred-able. Use it for pork tacos, to fill stuffed peppers, or smothered in a BBQ sauce and served on a bun with coleslaw.   The original recipe calls for a 6-lb boneless pork shoulder, but feel free to use a larger roast.  If the roast you have is much larger than this, you may want to increase the amount of rub accordingly.  The cook time however, should be about the same.

Michael Chiarello's Slow Cooked Pork
Adapted from Michael Chiarello
Speaking of planning ahead, if you think of it, roast the garlic the night before you plan to make this. That way the garlic will have cooled, and you will avoid burning yourself when squeezing it out of the papery skin and chopping it.   Alternatively, many markets have roasted garlic available in the packaged produce section.
Yields about 10-12 cups shredded pork

Roasted Garlic Rub:

2 cups roasted garlic, minced (about a dozen heads)
5 tablespoons kosher salt
1/4 cup coriander seeds, toasted and ground in spice grinder (I didn't bother to toast mine.)
2 tablespoons mustard powder
4 tablespoons dried chipotle pepper, ground
2 tablespoons dried thyme
5 tablespoons dried rosemary, finely chopped
5 tablespoons lemon zest (That's a lot of lemons, so squeeze the juice and make a couple glasses of lemonade, by adding simple syrup, water and ice.)
2 1/2 teaspoons black pepper

Combine all ingredients.  The original recipe recommends using a food processor, but a fork and mixing bowl works fine for me (and saves the effort of washing all the food processor parts).  Just be sure that the roasted garlic paste absorbs all the seasonings.

Pork 
1 6 lb (or larger) pork shoulder roast, not tied

Preheat oven to 275F. If necessary, trim fat from top of pork, leaving a 1/8-inch thick layer of fat. Spread Roasted Garlic Rub all over pork and inside any cavities.   Put pork, fat side up, in a roasting pan and roast in middle of oven 6 to 8 hours. 

Transfer roast to cutting board and let stand 15-30 minutes. Pull shreds apart with tongs or forks, being careful to remove any unappetizing chunks of fat.  You may be a more efficient meat-shredder than me, but it took me about half an hour to shred a double batch.  Let shredded pork cool completely, before transferring to appropriately sized freezer bags.   Squeeze out all the air and close tightly.  Flatten for easier storage and store in the coldest part of your freezer for up to 3 months.


Note on Warming tortillas:
Skip the microwave.  If you have a large stack of tortillas wrap in foil and place is a 325º oven until heated through, about 10-15 minutes.  For a smaller number of tortillas, warm flour tortillas individually in a dry skillet or warm corn tortillas in a lightly oiled skillet over medium heat less than 30 seconds per side.  Keep tortillas warm and pliable by wrapping in a clean kitchen towel.

August 24, 2010

B.L.T. Salad

I've had a hard time getting motivated to cook dinner in the last few weeks.  Apparently, I'm not the only one.  I've thought a lot about why that might be, and I've come up with a lot of excuses:  school has started and the new routine has limited the amount of time we have in the evenings, my husband has been working most evenings, so there's one fewer mouth to feed (and one fewer set of hands to help with cleanup).  We've been dog-sitting and the dogs have taken over my comfort zone in the kitchen.  Our food budget has been "adjusted."  But of course, none of those excuses are nourishing our bodies, so this week I gathered up my un-shopped-for shopping lists, examined the budget and figured out what I could afford to buy and cook for dinner every night this week.

Yesterday we had Pork Tacos using shredded pork that I had cooked and frozen, topped with Tomato-Peach Salsa.

Today we had B.L.T. Salad.

Two days down.  Three to go.

It seems silly to me to share a recipe for a salad, because by nature salads are so infinitely variable.  But I really enjoyed this one, and so did my husband and our 6-year-old (with minor modifications), so I think it is worth sharing.  It has all the things that make for a great salad:  crisp mild lettuce, crunchy croutons, sweet juicy tomatoes, tangy dressing, satisfying saltiness and, most importantly, BACON.  Please understand that if you don't have butter lettuce or you prefer romaine, I expect you to make that substitution.

For kids, I like the strategy of serving salads "deconstructed." As I assemble the main salad in a serving bowl, I put a small amount of each item in separate piles on my daughter's plate, omitting onion and serving the dressing on the side.  It doesn't require any more work and it prevents whining at the dinner table.  "Mom, you know I don't like lettuce!... I only want bacon and tomatoes and croutons."

B.L.T. Salad
Though bacon and croutons can both be made in skillets, I prefer the less-mess option of preparing them in the oven. For even less mess, line the baking sheets with foil. 
Serves 4 as a light lunch or dinner.  Top with cooked chicken for a heartier meal.

Bacon & Croutons:
1/2 lb bacon, cooked, reserve 1 tablespoon of bacon dripping for dressing
1/4 lb artisan bread, stale if you have it
2 tablespoons olive oil
kosher salt and pepper
1/2 cup finely shredded hard cheese, such as Parmigano Reggiano or asiago
Lettuce & Tomato:
1/2 lb cherry tomatoes
6 oz butter lettuce
1/4 sliced red onion
1 avocado, sliced or diced
Dressing
1 tablespoon balsamic vinegar
1 tablespoon olive oil
kosher salt and black pepper

Bacon:  Set wire rack over rimmed baking sheet and spread bacon in single layer on wire rack.  (It is very important that the baking sheet be rimmed, because the bacon fat will drip onto the sheet and it must be contained.  If it were to drip onto the floor of the oven, you would end up with a smoky kitchen.)  Set baking sheet on middle rack of oven.  Turn oven temperature to 375º.  Set timer for 15 minutes and continue with Crouton Step below.  If bacon is not done by the time the croutons finish, increase heat to 400º and let cook 5 minutes without opening the oven door.  Note that bacon will continue to crisp slightly after being removed from the oven. Be very careful removing the bacon from the oven as the bacon grease is very hot.  Let cool slightly.  Crumble bacon between fingers or chop with a knife. Reserve 1 tablespoon bacon drippings in small mixing bowl or glass measuring cup.

Croutons:  Slice bread into 1" cubes, toss with olive oil, season liberally with kosher salt and pepper, and spread evenly on second rimmed baking sheet.  (Optional:  place half of your cherry tomatoes on one end of this sheet.  You don't want to them mixed in with the croutons, because if they burst they could make the bread soggy or encourage blackening, but there's no need for a third baking sheet.)  Slide baking sheet into oven next to first baking sheet.  Timer should have approximately 7-10 minutes left. After 5-7 minutes, stir and continue to check every couple of minutes for browning and crispness. When croutons are almost done, remove baking sheet from oven, pile croutons in the middle of the sheet, sprinkle with cheese and shake pan to form an even layer.  (It is okay if the tomatoes mix in at this point.)  Return croutons to oven just long enough to melt cheese, about 1 minute.  Croutons will continue to crisp after being taken out of the oven.

Dressing & Assembly:  To reserved bacon drippings add balsamic vinegar, 1 tablespoon olive oil and a small pinch of kosher salt and a couple grinds of pepper.  Whisk to combine.  In large salad bowl combine lettuce, tomatoes, onion, crumbled bacon and croutons.  Drizzle with dressing and top with avocado.

August 22, 2010

Tomato-Peach Salsa

Some summer nights are just too hot to cook.  Sometimes, it is so hot, I'm not even hungry.

Well, maybe a little munchy, and definitely thirsty.  

Too often, I'll open a bag of chips while rummaging through the cupboards trying to figure out what to do for dinner.  By the time I have figured it out and prepared it, I'm really full of chips, and don't need dinner.  On those occasions, why not raid the produce bin, or step out to the garden, and throw together Mark Bittman's simple Tomato-Peach Salad to serve with  those tortilla chips (and your favorite summer beverage), and call it a day?

This comes from the New York Times article, 101 Simple Salads for the Season.  This is recipe #2, but don't stop there.  There are 100 other good ideas for simple summer salads that might make an enjoyable light dinner or a nice contribution to a summer potluck and hopefully stave off dinner-equals-a-bag-of-chips-syndrome for one more night. 

Tomato-Peach Salsa
Adapted from Mark Bittman as seen in the New York Times.

Mix equal parts diced tomato and diced peaches.  (For 4 servings I use 2 or 3 of each.)  Mix in some thinly sliced red onion (about a 1/4 cup), and as much chopped cilantro as you wish. Drizzle with olive oil and the juice from 1 lime (2 if you end up with limes that aren't very juicy.)  Sprinkle with kosher salt and pepper.  Let sit 15 minutes so the flavors can meld.  Serve with tortilla chips. 

August 19, 2010

Caramelized Pear Ice Cream

Loyal readers will know that last week I had my heart set on David Lebovitz's Caramelized Pear Ice Cream.  I had 6 pears that seemed to refuse to soften for the better part of the week.  Finally... finally, seven days after purchase, three of them were (finally) ripe enough to try the recipe.   All week long I had dreamed of smooth, creamy, cold caramel-ly goodness perched atop a sugar cone.

I suppose it all started a couple months ago I made David L.'s Salted Butter Caramel Ice Cream.  Oh my goodness!  It was spot-on perfection.  So creamy: melt-in-your-mouth caramel that remained scoopable even 4 days later.  Except that a particular 6-year-old turned off the freezer and everything melted.  There was just less than a cup of that caramel ice cream goodness left and, not one to waste anything, I refrigerated it and poured it into my iced coffee the next morning, which only made me fall more madly in love with the ice cream.

Except that I think I must have been stirring constantly for two hours.  And readers, you know me by now, I am gung-ho to do that once, but next time I try a shortcut!

You see, when I made the Salted Butter Caramel Ice Cream my caramel seized when I added the butter, then seized again when I added the cream custard and both times the recipe instructs the cook to keep stirring over low heat until the caramel melts.  All this was before I was blogging, so I didn't time it, but it took too long.

So when I discovered Caramelized Pear Ice Cream, made with no butter and without a custard base, I thought I'd found my shortcut.  Except that this ice cream tastes like caramel and pears.  I know what you're thinking, "Duh." I guess I was hoping that the pears would be more of a carrier than a flavor.  And not only are they a flavor, but the ice cream has a little bit of pear grittiness.  It is a unique flavor combination, and letting in 'ripen' in the freezer for a day or two is a must to help the two distinct flavors combine. As someone with more foresight than me might except, this isn't the right thing to melt and drizzle into your coffee.

Oh, it has perfect scoopabilty, even after 5 days in the freezer, and being without a custard base, it is a very simple recipe.  It might just make the perfect gourmet ending to a dinner with friends, but me, I think I'm going to have to make that Salted Butter Caramel Ice Cream again. I'll be sure to let you know when I do.  And in the meantime, if you make anything that might satisfy a caramel craving, please tell me all about it.


Caramelized Pear Ice Cream
Adapted from The Perfect Scoop by David Lebovitz.
Makes 1 quart.

3/4 cups + 2 tablespoons sugar
3 ripe pears, peeled and cored, then cut into a 1/4" dice
2 cups heavy cream
1/8 teaspoon kosher slat
a couple drops of lemon juice


1.  Spread sugar evenly in heavy-bottomed pot (something with at least a 2 quart capacity).  Heat over medium heat.  Don't be too anxious to stir.  When you can see that the bottom layer of sugar has melted, stir carefully with a heat-proof spatula to encourage the sugar crystals on top to melt.  Stir occasionally until the sugar has melted and become a deep caramel color.  (It goes without saying that melted sugar is wicked hot, so be careful.)

2.  Pour all of the diced pears into the sugar at once.  Stir to combine with the caramel.  Your caramel will seize.  It's okay.  Cook over medium heat, stirring occasionally for 10 minutes.  At this point all the caramel will have melted and the pears will have softened.  Remove from heat.

3.  Stir in 1/2 cup of cream.  Then stir in the rest of the cream, the salt and the lemon juice.   Let cool to room temperature.

4.  Pour into blender and blend until smooth.  Strain through a fine mesh sieve.  Churn in your ice cream maker according to manufacturer's directions. (Using my Cuisinart, I did not find it necessary to chill before churning.  Churning took about 20 minutes. )  The consistency will be softer than soft serve.  Transfer to 1 quart container and ripen in freezer at least 24 hours.


August 17, 2010

Big Sur Bakery's Brown Butter Peach Bars -Yes, Those

Ok, I did it.  Call me crazy, but I did it.  I made those Brown Butter Peach Bars that were featured in the New York Times two years ago.  The ones all us foodies read about and drooled over and thought, "Oh, I'd love to try that!" ...And then read the recipe over a few times and decided tentatively, "That is just way too much work!"


If don't read the New York Times Dining & Wine section as obsessively as I do, you may have missed it; here's the rundown.  The directions start with, "Make the jam..."  which requires a candy thermometer...  Not only do you make jam, but also a crust and a filling.  Multiple steps end in "cool to room temperature." or something similar.  I can't even count how many pans were dirtied.  It is the kind of kitchen adventure that takes the better part of a weekend, and I finally got sucked in.

I had all those peaches my mother brought over, and I didn't want to go through the hassle of canning jam--I know, if I would have opted for the jam, I would have been finished with the task on Saturday, and I would have had jam to last until next peach season....  But this Big Sur Bakery's Brown Butter Peach Bar recipe has been firmly lodged in the back of my brain for two years, and this weekend when I looked at that bucket of peaches, and remembered that I had an extra vanilla bean in the cupboard, well, logic escaped me, and I was done for.  Actually, at first I was only going to make the jam-a batch and a half, and refrigerate it. But, c'mon really? If you're going to go that far, why not go all the way?  And what was I really going to do with all that jam if I wasn't willing to take the time to can it?

I halved the peaches.  I like how the recipe says to leave the peel on, because peeling peaches is a pain in the butt, and really, I think if the recipe directed you to blanch and peel the peaches, that might just have been a deal-breaker for me. I scraped out the red flesh that held the pit in.  Always scrape that out, it can be quite bitter.  I chopped the peaches and put them in my Dutch oven with sugar and half a vanilla bean and then I  let it cook... and cook... and cook.  The recipe says to cook over medium, stirring occasionally, until the jam reaches 220º on a candy thermometer, "about 35-45 minutes."  Well, mine sat on the stove and bubbled and splattered for close to an hour, hovering at 215º for over 10 minutes, and I finally decided that that would have to do.  I was waiting for the jam to finish, so that I could make a quick run to the market for butter and oranges, while the jam cooled. (The original recipe calls for orange juice and zest in the jam, but I didn't have it, so I omitted it, and I don't regret that.  Even without the orange in the jam, the end result had a sparkling orange flavor from the zest in the filling.  It was delicious, but it did mess with my localized palate.  I'm used to peaches in the summer and oranges in the winter (though of course Valencia oranges--more of a juicing orange-are available in California in the summer and fall, until the more iconic navel oranges flood the market in the winter).

On Saturday I also browned the first batch of butter.  Yes, this recipe directs the cook to brown two separate batches of butter. The first one is for the crust.  You brown the butter, then freeze it to harden it.

When the butter has chilled and hardened, you cut it into a mixture of powdered sugar and flour to make a crumb crust.  Then you chill the crust for 30 minutes, before baking and cooling.  At this point, with the jam and crust finished, and all those dishes washed, it really feels like you've hit the home stretch, only the filling and assembly remain.

For the filling, you brown more butter, this time with the other half of the vanilla bean.  The recipe didn't say to let the butter cool before adding it to the other ingredients, which I thought was an odd break from the habit established in the preceding steps.  You whisk eggs, sugar, orange zest and flour together, then add the browned butter and whisk to combine.

In the cooled crust, you spread half of the filling, then dollop in most of the jam.  Top with the rest of the filling and complete the assembly with a few more spoonfuls of jam.

Bake at 375º for 18-20 minutes and breath a sigh of relief that it is over and the results just might be worth it.

The recipe says to cool completely, but c'mon, I've waited 
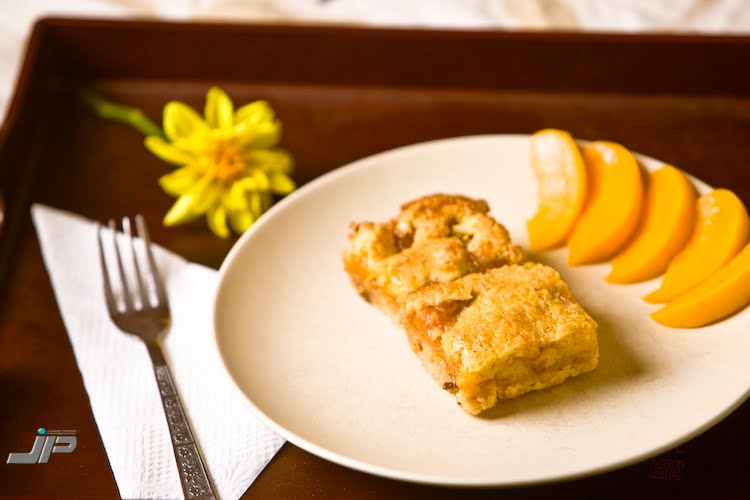
2 days  2 years, for this!  So I waited abut half an hour until I could tell that sneaking a corner wasn't going to damage the structure of the rest of the pan--you know how if you slice a loaf of bread when it is too fresh, too much steam escapes and the texture doesn't recover?--Fresh out of the oven like that, I can't say that I was disappointed.  The crumbly shortbread crust stood up nicely to the jammy peaches and-my favorite element-the fluffy, golden filling.  Left overnight, the crumbly crust becomes a little sandy and the peach jam and the orange filling meld together to become gooey and sticky and just a little on the indulgently sweet side. This is the kind of recipe that makes you understand why a decent pastry costs thee or four dollars.  It's a lot of work.  It's delicious, and I am so glad that there are people who make these things for a living, because I'd love to have one again, but I don't generally have the kind of time necessary to complete this recipe.

And for all those foodies out there who have contemplated making these, but just have not made the time:  There are a lot of good recipes for crumb bars out there.  The two elements that complicate this recipe-the jam and the brown butter-aren't necessary for a totally enjoyable crumb bar.  So if you want Big Sur Bakery's Brown Butter Peach Bars, go for it; it's a fun project and the end result is spot-on.  But if you feel like taking a shortcut and using a different good-quality jam, instead of making the one in the recipe, or the making the crust without browning the butter, the result will still be perfectly passable for a pastry-and-coffee morning or a lunch box treat, it just won't be Big Sur Bakery's Brown Butter Peach Bars.

Brown Butter Peach Bars
Adapted from the Big Sur Bakery via The New York Times
A gooey, orange-peach combination over a substantial buttery crust.

For the Jam

1 cup sugar
Juice and zest from 2 oranges
1/2 of a vanilla bean, halved, seeds scraped.  Reserve the other half for the filling.
4 cups peaches, pitted, but not peeled, cut into a 1/2 inch dice. About 2 pounds of peaches will yield this amount.

For the Crust

1 cup unsalted butter
1/2 cup confectioners (powdered) sugar
1 1/2 cups all-purpose flour

For the filling

3 eggs
1 cup sugar
zest of 2 oranges
1/3 cup plus 2 tablespoons all-purpose flour
1/2 of a vanilla bean, seeds scraped
10 tablespoons unsalted butter

1.  Make the jam (10 minutes prep/1 hour cook):
In large heavy-bottomed pot, such as a dutch oven, combine jam ingredients.  Cook over medium heat, stirring occasionally, until temperature registers 220º on a candy thermometer.  This will take 35 minutes to an hour.

2.  Start the crust (10 minutes cook/2 hours to overnight chill):
Melt butter in small saucepan over medium high heat, stirring frequently with a heatproof spatula or wooden spoon.  Continue to cook until butter turns brown and smells nutty, about 5-10 minutes.  Be careful, butter can go from golden to black and burned in just a few seconds.   Strain browned butter into a heatproof container, such as a Pyrex measuring cup, and freeze until solid.

3.  Finish the Crust (10-15 minutes prep/30 minutes bake/1 hour cool):
Sift confectioners sugar and flour into a large mixing bowl.  Scoop butter out of container and slice into smaller pieces.  Cut butter into flour mixture using a pastry cutter. Blend until crumbly.  Press into an ungreased 13x9" glass baking pan.  Refrigerate 30 minutes.  Preheat oven to 375º.  Bake until golden, 18-20 minutes.  Let cool.

4. Make the Filling (10 minutes cook/5 minutes prep):
In small saucepan over medium high heat, melt butter with vanilla bean and seeds.  Continue to cook until browned.  Meanwhile, whisk together eggs, sugar, orange zest and flour in a medium mixing bowl.   Strain out vanilla bean and milk solids, pouring browned butter into filling mixture.  Whisk to combine. This takes some elbow grease.

5.  Assemble Brown Butter Peach Bars (5 minutes prep):
Spread half of filling over cooled crust in pan.  Tilt pan from side to side to spread evenly.  Using a table spoon, dollop about 3/4 of the jam over the filling.  Pour the remaining filling as evenly as possible over the jam, then finish with small dollops of jam.

6.  Bake and Cool (30 minutes bake/1 hour or more cool):
Bake at 375º until the filling is golden brown, about 25 to 30 minutes. Cool completely in pan.  Cut into 24 bars.

Photo credit:  Jason Powers Photography
(Photo added September 6, 2010)

Other bloggers crazy enough to try 
Big Sur Bakery's Brown Butter Peach Bars:

South in Your Mouth - I especially appreciated her comments about the citrus.  She has a nice photo of the finished bars.

Izzy Eats

My Best Days Ever

Gastroanthropology -This blogger substituted other jam for the make-your-own in the recipe, so they are not Big Sur's, but they sound delicious none the less.

August 14, 2010

Grilled Peaches

Maybe I've mentioned this before:  In our house, delicious summer fruit is usually eaten out of hand or in a fruit salad. Who doesn't love chucks of melons and nectarines, peaches and plums, especially when augmented with some perfect summer blueberries?  A fruit salad is a safe dish at a potluck and a refreshing afternoon snack.  So why push the boundaries?

Well, grilled peaches have made the covers of magazines long enough to no longer be dismissed as a trend, so I finally decided to try them.  I found a recipe online and when I was recently asked to bring a dessert to dinner at friend's house, I thought about cookies, or ice cream, but I tentatively asked, "Have you ever had grilled peaches?"

"My mom makes grilled peaches and it is like eating candy. Great with vanilla ice cream."  So it was decided.

The recipe I found on Trader Joe's website called for brushing peach halves with a mixture of agave sweetener and butter and then dipping them in minced crystalized ginger before grilling them. Grill cut side down at a high temperature until grill marks appear.  Then flip and fill and hole where the pit came from with a spoonful of mascarpone cheese. Leave on the grill just long enough to melt the cheese.  And viola: a rather gourmet grilled peach!

Well, honestly, I kind of think that the recipe was a marketing ploy to get people to buy agave sweetener, crystalized ginger and mascarpone cheese.  The crystalized ginger didn't stick to the peaches, and therefore imparted no flavor, but it would have been a nice touch if it did.  Maybe it would have been better to mix the minced crystalized ginger with the butter or serve the peaches with ginger ice cream.  Though agave pairs well with fruit, the flavor of the agave was completely overpowered by the char and the cheese, so why not use something more common such as honey or sugar?  I had not ever had mascarpone before, and you know, why not just use vanilla ice cream?

Don't get me wrong.  I think that Grilled Peaches are a fabulous ending to a summer BBQ.   They were a big hit!  Grilled peaches are like a peach cobbler, but without the cobbler to get in the way of the vanilla ice cream melting deliciously over the warm peaches.  I see no need to complicate it.  The extra elements (agave, ginger and mascarpone) in the recipe were unnecessary.  I must note, though, that some of my friends, really did enjoy the mascarpone.  But if I come to your house on a warm summer night, and you want to do Grilled Peaches, can we please have some ice cream on top?

Grilled Peaches
inspired by multiple magazine covers and loosely adapted from Trader Joe's.
A simple, almost-no-prep dessert, the perfect ending to a summer BBQ.  Serves four.


If the flesh of your peaches where the pit is removed is red, scrape it out with a spoon.  That red part can be quite bitter.


2 tablespoons butter, softened
2 tablespoons honey, agave sweetener, maple syrup or sugar
4 just ripe, not overly-ripe, freestone peaches.
1 pint vanilla ice cream

Combine butter an honey in small bowl.  Halve peaches and remove the pits.  Brush honey-butter on cut side of peaches.   Grill peaches over high heat 1-2 minutes on both sides.  Let cool 5 minutes.  Serve two peach halves topped with 1/2 cup of vanilla ice cream.

August 12, 2010

Waiting

Tonight I was not in the mood to cook. In fact, by the time Thursday comes along I am usually not in the mood to cook.  I'm just tired and focused on there being one more workday until the weekend.  Actually tonight I was pretty psyched up to make that Caramelized Pear Ice Cream that I have been thinking about all week, but those darn pears are still hard as rocks.  I keep dwelling on the expectation of creamy caramel melting in my mouth, and I just couldn't get motivated to create anything else this evening, so we had some Trader Joe's Orange Chicken for dinner and called it a night.

I briefly considered trying David Lebovitz's Vanilla ice cream, which was recommended by a reader.  I mean, I even happen to have a vanilla bean on hand right now, but no, I really just wanted to snuggle my kids and get them to bed early and maybe get to bed a little early myself!

My mother brought over more peaches this evening. I must have fifteen pounds.  I could make a large batch of chutney this weekend if I want to, but right now the motivation escapes me.  Maybe after some good rest, I might tackle that project.  The last few summers I've made Peach Chutney, canning it in a water bath canner, to give as Christmas gifts.  And I'd like to do it again, but there's something daunting about getting out that huge canning kettle for the first canning job of the summer.  I'm afraid this summer, I just might not get to it.

Being a successful home cook requires a good portion of waiting and planning ahead-waiting for fruit to ripen or for bread dough to rise. Soaking beans, sprouting grains, waiting for canned goods to process and then ripen.  And sometimes I'm just not in the mood to wait and I've failed to plan ahead.

So while I wait impatiently for those pears and while those peaches are waiting impatiently for me, I think I'll go read a good book and get to bed a little early.

Molly Wizenberg is the creator of Orangette, a food blog.  A Homemade Life is a food memoir.  It is a beautiful tribute to her father, and, as a celebration of home cooking, each chapter ends in a recipe.  Last night I got to read all about her father's delicious french toast.  I haven't made french toast in quite a while, but suddenly it sounds so appealing...

August 11, 2010

Peach Frozen Yogurt

 Pears made their first appearance at the Farmers Market this weekend, and that means that soon I will be able to try David Lebovitz's Caramelized Pear Ice Cream that I have had bookmarked for months.  I bought six pears and set them in a row on a shelf to ripen.  They should be ripe in just a few more days.  But I am already thinking about ice cream.  And 3 or 4 days seems like a long time to have to wait. The ice cream freezer insert is sitting impatiently in the freezing compartment.  What am I to do?

My mother stopped by last night with seven perfectly ripe peaches, so I'll settle for a quart of Peach Frozen Yogurt in the meantime.  Do you cook like me?  I tend to choose two or three recipes in advance that I am totally excited about.  When I do my weekly shopping they are in the forefront of my mind--I've got to get pears and cream for that ice cream!-- and then I come home from shopping and struggle to figure out what else to cook during the week.  I'm psyched up to put a significant amount of effort into that Pear Ice Cream, but today is not the day for Pear Ice Cream or significant effort.  I just want a simple dessert to tide me over using what I have on-hand.  I don't even want to open a cookbook.

So here is a simple Peach Frozen Yogurt, based on my go-to frozen yogurt recipe:  One and half cups fruit with one and a half cups yogurt, sweetened with about half as much sugar (by volume). This is not the creamiest frozen desert ever.  If you don't eat all of it right away, it will become a little icy stored in the freezer. Plan to remove it from the freezer and thaw it in the refrigerator or on the counter for about a half an hour before serving to improve the texture.  It is also not the quickest frozen dessert.  (Try Watermelon Sorbet.)  But when made with delicious summer peaches and good quality yogurt, it makes a mini-celebration of summer.

Full disclosure:  The refrigerator at my office is one of those compact ones with the rather pointless mini freezing compartment inside of the fridge, that is not cold enough to keep anything frozen.  I like to fill a one-cup-Gladware with hard-frozen frozen yogurt and store it in the freezing compartment until after lunch, when it has semi-melted to the perfect soft-frozen consistency.  A real afternoon treat!

Peach Frozen Yogurt
Makes 1 quart.  For tips on customizing your frozen yogurt experience, check here.

1 1/2 cups peaches, mashed, about 3 medium-large peaches
1 1/2 cups plain yogurt
approx 3/4 cup sugar  (I used 1/3 cup granulated sugar and 1/2 cup brown sugar.)
Optional: 1 teaspoon vanilla extract or cardamom or maybe a 1/2 teaspoon of ground ginger

In small saucepan, combine peaches and sugar. Cook over medium heat about 5-10 minutes to dissolve sugar and thoroughly soften peaches.  Add optional seasoning, if using. Taste, and add more sugar, if desired. You want it fairly sweet to compensate for the tartness of the yogurt that will be added.

Chill peach mixture in refrigerator.  (You could also chill it in an ice bath by pouring the mixture into a medium bowl set inside of a large bowl filled with ice.  Stir the mixture until it cools.  I'd rather pour the peach mixture back into the glass measuring cup I used to measure the peaches and put it in the fridge for an hour.)

In blender, combine chilled peach mixture with yogurt.  Blend approximately 10 seconds, until mixture is smooth.  Pour into ice cream machine and freeze according to manufacturer's directions.

For soft serve consistency, serve immediately.  For firmer consistency, transfer to 1 quart container and freeze approximately 2 hours. Store leftovers in freezer up to 4 days, but allow to thaw slightly before serving.

August 10, 2010

Granola

Have you read Joy of Cooking?

If you haven't, I'd say it's time for a trip to Mom's house.  Maybe you don't remember seeing it there, but it is very likely that she has a copy.  Joy of Cooking is almost as ubiquitous as Betty Crocker, but the plain white cover is a little more non-descript.  Many of the recipes within are a bit more intermediate.

I received my copy from a very good friend as a wedding gift.  Every time I use it, I think happy thoughts about her.   I doubt that she knew at the time how dear her gift would be to me, but Joy of Cooking has long been the proverbial one-cookbook-I-would-take-with-me-if-I-were-stranded-on-a-dessert-island. You see, it not only has recipes that use the ingredients, Italian Tomato Paste and Cream Cheese, it also has recipes to make those specific ingredients (pages 574 and 537, respectively, in my reprinted 1975 Edition).   When I finally get up the gumption to make Sourdough Starter, I'll be on page 555.  I won't mention the 13 pages on "Variety Meats," but if I ever want to know how to make Pigs Knuckles and Sauerkraut, I will know where to turn (511).

For cooking nerds like me, in places it reads like a Choose Your Own Adventure novel.  For example, the recipe for Chocolate Eclairs (647) refers the cook to the preceding recipe for Cream Puff Shells, then asks the cook to choose a filling, "Whipped Cream, or Custard Chocolate or Coffee Fillings, 697."  Turning to page 697, the cook finds under the heading, "Custard Cream Pastry Filling," not only the vanilla, chocolate and coffee custards, but also banana. Back on page 647, the cook is referred to page 726 to choose between Chocolate or Caramel Icing.

Not only that, but these authors have a sense of humor.  From the introduction to Dried Legumes (286): "Dried peas and beans, being rather on the dull side, respond readily--like a good many dull people--to the right contacts..."

Now that we've established that Maria is more of a cooking-nerd than you had realized, on to the recipe, right?

The granola I make once a month to accompany my morning yogurt is from Joy of Cooking.  It is their Granola II (198).  No, I have not made Granola I or Granola III.   When I first wanted to make granola, I had all the ingredients on hand for Granola II, and I liked it so much that I have stuck with it.

Granola
Adapted from Joy of Cooking
Makes about 10 cups.

3 cups Old Fashioned rolled oats
1/2 cup vegetable oil
1/2 cup honey or maple syrup
1 1/2 cups wheat germ
1/2 cup dry milk solids
1 cup sliced or coarsely chopped almonds (I once swapped broken pecans for half of the almonds.)
1 cup shredded or flaked coconut (I might be cheating, but I do prefer sweetened flaked coconut here.  You can find the unsweetened variety in natural foods stores.)
1/2 cup sesame seeds
1 cup hulled sunflower seeds

Spread oats in 13x9" glass baking dish.  Toast in 300º oven 15 minutes, stirring once.

Meanwhile, heat vegetable oil and honey in small saucepan to combine.  In large mixing bowl, combine remaining ingredients.  Pour vegetable oil-honey mixture over nut-grain-seed mixture and stir to coat. The wheat germ and dry milk solids make wonderful sweet clumps when the oil-honey is added.

Pour nut-grain-seed mixture into baking dish with oatmeal.  Toast an additional 15 to 30 minutes, stirring occasionally, until everything is toasted.  Allow granola to cool in pan, then transfer to airtight container and store in refrigerator.  

August 7, 2010

Watermelon Sorbet


Do you like sorbet?

Wait, don't stop reading!  If you answered "no" to that question, I would venture to guess that it is because you are picturing yourself standing in an ice cream shop choosing between 30 rich, chocolate-ly, caramel-ribboned, peanut butter-chunk-studded ice cream options and well, um, sorbet.  Homemade sorbet is so much different than that. Picture yourself standing in the comfort of your own kitchen: a couple minutes with a blender and an ice cream maker, then sitting down to a nice meal with loved ones, a perfect, light summery dessert ready to woo your guests when the main course is finished.

This recipe is one of those happy kitchen accidents.  You see, before this accident, I was a sorbet-hater too.  But once upon a time I put half of a watermelon in the fridge and it got shoved back to the coldest part of the compartment when I wasn't looking.  When I pulled it out a few days later, the melon flesh had frozen, so that the texture was grainy falling apart, no longer pleasing for eating out of hand.  Being frugal to a fault, I had to at least try to salvage it, so I scooped out the flesh and whizzed it in the blender with some simple syrup and lime juice.  Then I churned the puree in the ice cream maker and the result was a luscious summer dessert so good I've actually made it on purpose since then.

Sorbet is a fruit puree churned in an ice cream maker.  It must be eaten as soon as it is finished churning, because, being-fat free, if you moved it to the freezer it would freeze solidly and, well, not be so great. (Unless, of course, you froze it in popsicles molds...)

Watermelon Sorbet


Makes about 1 quart, 4 generous servings or 6 sophisticated scoops.

1/3 of a large watermelon (or 1 small watermelon), enough to yield about 4 cups of puree.
1/4 cup blue agave sweetener or 1/3 cup simple syrup
juice of 1/2 a lime, about 2 tablespoons

Cut watermelon into chunks and remove seeds, placing chunks into blender as you work.  When blended, watermelon flesh will decrease in volume, so blend it and add more melon if needed to reach the 3 1/2 cup mark.  Add blue agave sweetener and lime juice and blend to combine into a smooth puree.  I have an old blender and this takes about 10 seconds, so it may be instantaneous in yours.  Taste and add more sweetener if you feel it necessary.

Transfer puree to ice cream maker and churn according to manufacturers instructions until soft and scoop-able (about 20 minutes in my Cuisinart).  Serve immediately.


Blue Agave Sweetener vs. Simple Syrup


Blue Agave is the same plant that tequila is made from.  This liquid sweetener has gained popularity in recent years.  It is sweeter than sugar and more pour-able than honey.  A number of health claims are made about agave, and I have no knowledge about which claims may or may not be true.  It has a unique, pleasant flavor.  I just happened to have it on hand, but simple syrup works fine in this recipe as well.

Simple Syrup is a mixture of 1 part sugar and 1 part water, simmered until the sugar melts. It keeps indefintely in the refrigerator and is nice to have on hand for sweetening iced drinks, when granulated sugar would just sink to the bottom of the glass.

August 6, 2010

Almost Argentenian

If you are like me you grew up eating 79-cent Taco Bell tacos, and only in more recent years discovered taco-truck tacos, and they quickly became your 'fast food' of choice, because of their sabor authentico... that and the fact that by buying $1.50 taco truck tacos you are supporting local business. Okay, I don't really know how authentico taco-truck tacos are, but I know that I much prefer real-meat-flavor and texture wrapped in fresh soft corn tortillas and garnished with fresh cilantro-salsa over the alternative.

I would hate to steer you wrong when it comes to authenticity.  I recently posted on Facebook that "I bought a beautiful bunch of parsley that I needed to use up.  I'm thinking chimicurri sauce..."  You know, that green stuff that looks like pesto, but that is made with parsley instead of basil?  I had never made chimicurri, so I needed a recipe.  I googled chimicurri and came up with lots of recipes, but one was quite different than the others.  The guy who wrote about it seemed to have a bone to pick with all the American celebrity chefs who tout that bright green sauce as authentic Argentinian chimicurri.  And since this guy lives in Argentina and writes about asados and Argentinian food and has devoted multiple blogs posts to this condiment, he must know what he's talking about, right?

I really don't know, but just in case his recipe is more authentic than the parsley-pesto version (and since it did not require a food processor), I chose his version as my inspiration. Notice that I said 'inspiration.' That's my little disclaimer that means that even if his version is authentico, my version is not. I changed it a little.  He is very clear that jalepeños and cilantro are not authentic in Argentinian chimicurri, but I added a jalepeño.  I've had a pound of jalepeños sitting in my produce bin for a week, because I was going to make escabeche, those delicious jalepeño-spiked pickled carrots that the taco trucks serve, but I accidentally used up all of the corresponding carrots to make baby food.  If I had had cilantro on hand I would have added some, because I just love the fresh flavor.

Chimicurri is a popular condiment for grilled meats in Argentina.  Some cooks use it as a marinade as well.  It is a vinegar-oil sauce with fresh herbs and vegetables.  Ideally, it is made a few days ahead of time so that the vinegar-oil can extract some of the delicious flavors from the herbs and vegetables and so the flavors can kind of soften or marry. Plan ahead and prepare chimicurri while you are making a salad earlier in the week.  Just chop up some extra veggies and herbs, put them in a jar and cover with vinegar and oil.  The wait time cuts the harsh acidity of the vinegar and results in a fresh-tasting, slightly crunchy constrast to a meaty, smokey steak.  And if you prepare some chimicurri and frijolies a couple days in advance, simply grill a steak and accompany with some crusty bread or tortillas to have a quick weeknight meal.  Whether or not it is authentico, it is delicious: tangy, crunchy, colorful.  One large spoonful takes a meal up a notch.


Chimicurri Sauce
Inspired by Asado Argentina

To serve, spoon over sliced meat, chicken or fish, or assemble a sandwich using thinly sliced steak and chimicurri on good baguette.  This would also be fabulous served over a poached egg on a bed of frijoles.  

1 small bunch flat-leaf parsley, stems removed, chopped, about 1/2 cup
1 small bunch cilantro, stems removed, chopped, about 1/2 cup
1 medium onion, finely chopped
4 cloves of garlic, minced
1 jalepeno, cut in half, seeds removed, minced
1 small pepper (use red or yellow for a good color contrast), chopped
1 small tomato, peeled, seeded an chopped
1 tablespoon dried oregano, crumbled
1 tablespoon paprika
1 teaspoon bay leaves, crumbled
1 teaspoon coarsely ground black pepper
a good shake of red pepper flakes
1-2 tablespoons kosher salt
1/2 cup red wine vinegar (I used white wine vinegar.  I'm sure apple cider vinegar would work well.)
1/2 cup water
1 cup canola oil or extra virgin olive oil

In 1 quart mason jar (or similarly sized vessel), combine all ingredients except salt, oil, vinegar and water. Sprinkle in salt and stir.  Let sit half an hour.  (Though not totally necessary, this waiting step helps extract some of the flavors from the veggies and herbs.  I forget to do this step.) Add vinegar and water and wait another 30 minutes, if time allows.  Finally add oil. Stir. Be sure that the herbs and vegetables are covered by at least a 1/4 inch of liquid.  If they are not, add equal parts vinegar, water and oil until they are.  Refrigerate at least a day, but ideally 3 or 4 days before serving over grilled meat, chicken or fish.  If oil congeals, allow to sit at room temperature to bring to liquid consistency before serving.

August 5, 2010

Beans and Why I Like Them

I've been to a couple of potlucks this summer where someone's homemade beans seemed to be the star of the show.  This seems odd to me; I guess I would expect that some fabulous meat dish would take the cake, but seriously, people get pretty excited about homemade beans.  I've had people say, "You make your own beans?" as if it is a real culinary accomplishment.  So let's pretend it is.

With a little planning ahead and about $2 of expense, you can bring a side dish that serves 12 that might just be the talk of the evening...  Did I mention that homemade beans, though requiring some foresight, don't need much in the way of hands-on time?  A kettle of beans is an easy thing to throw on the back burner while you prepare dinner.  They keep in the refrigerator about a week and they are a healthful and delicious accompaniment to Mexican dishes as well as American BBQ favorites.

Frijoles
Mexican Beans
I assume I originally got this recipe from the label on a bag of beans.  This recipe is based on pinto beans, but the same process can be applied to other dry beans.  Alter the seasoning according to your taste. 

1 lb dry pinto beans
1 onion, any color, diced
6 cloves of garlic, crushed
1 tablespoon dried oregano (or Italian Seasoning)
lots of black pepper
1 dried cayenne pepper (optional)
kosher salt


Soak: Dry beans should be rinsed and examined before cooking.  Remove any small rocks or clumps of dirt. In Dutch oven or large pot, soak 1 lb of beans in about 12 cups of cold water overnight or all day.  (If you forget this soaking step, you can still make beans, but you'll need to allow about 30 minutes extra cooking time.)

Cook:  Turn the heat on under a Dutch oven or other large lidded pot.  As water is coming to a boil, dice onion and crush garlic and add to pot.  Add oregano, lots of black pepper and the cayenne.   Do NOT add the salt and do not add anything acidic (such as vinegar or citrus juice), as these ingredients will prevent the beans from softening. When water boils, stir and reduce heat to a simmer.  Depending on how your stove works this may be medium, with no lid or low with the lid slightly ajar.  You want some steam to escape, partly because the aroma of that onion and garlic is so delicious. Keep an eye on your beans, you don't want them boiling; this would burst the skins, but you don't want the water stagnant.  You want a true simmer with some bubbling.  You also want the beans to remain under liquid by about half an inch.  If the liquid level drops below the beans, add more water. You might want to have a tea kettle of hot water handy, so that you don't reduce the temperature by adding cool water and slow the cooking.  Depending on the freshness of the beans and temperature of the water, the beans will need to cook from 1 hour to 1 1/2 hours.

After about an hour, check the beans by spooning a couple out, running them under cool water and biting into them.  They should be soft, but not falling apart, with no crunch or graininess. When beans are softened, add a generous tablespoon of salt and more black pepper. Turn the heat up so that the liquid cooks out and the salt seasons the beans. If you've kept your liquid level just above the beans this should take about 5 minutes.  If there's a lot of liquid, you may want to drain some of it out, before adding the salt and pepper, but understand that you are loosing some of the flavor with that bean water.

August 4, 2010

Another Great Summer Breakfast

I tend to eat the same thing for breakfast over and over.  A lot of people seem to eat cereal for breakfast everyday, so I suppose that's normal.  But I am really not a cereal person.  I like a breakfast with a little more substance.  And while I generally like variety, for breakfast I need something quick, that I can prepare on auto-pilot while my coffee is brewing.  Last summer I had toast with cream cheese and fruit quite often.  Two years ago, when I had a few collard greens in the garden, I had a poached egg over sautéed collard greens and onions at least a few times a week. This summer my go-to breakfast has been homemade yogurt with granola. Yes, I know I promised to share the granola recipe with you, and I'll get to it.  It's just that when a reader shared her favorite summer breakfast with me, the highlight being beautiful apricots, I had to get to it right away.

This is a crisp, a baked sweetened fruit dish with a crunchy top layer, perfect for topping with a scoop of plain or vanilla yogurt. Its super-simple prep work takes less than 10 minutes and only dirties two pans and a couple spoons.  It bakes in half an hour, and can be made the night before and left to sit on the counter or refrigerator until morning.  The wait time helps the flavors blend.

By now you know that I favor recipes that I can store in my memory bank and alter according to what I have on hand.  This is a good candidate, as it only requires one measuring spoon (a tablespoon) and one measuring cup (a half cup).  The original recipe is written using apricots, and the crunchy, sweet topping contrasts with the tartness of the apricots nicely.  My husband is not a big fan of apricots; he prefers cherries, so I did try this recipe once with cherries.  I felt it was a bit too sweet for breakfast, but then again, I not a big fan of cherries.  He really enjoyed it.

Breakfast Apricot Crisp 
Adapted from Smitten Kitchen

Fruit Layer
1 lb fresh apricots
3 tablespoons sugar
1 tablespoon flour
pinch of freshly grated nutmeg

Topping
1/2 stick of butter
6 tablespoons regular or turbinado sugar
1/2 cup old-fashioned oats
1/2 cup flour (use whole wheat if you prefer)
big pinch of salt
2 tablespoons sliced or chopped almonds

Preheat oven to 400º.  Break apricots in half.  Then tear each half in half, so that apricots are in quarters. In 4x7" baking dish or similar sized casserole dish, combine apricots with sugar, flour and nutmeg.  Stir to combine.

Topping: In small saucepan, melt butter.  When butter has melted completely, stir in sugar, then stir in oats. Then stir in flour.  Mixture should form clumps. Then stir in salt and almonds. Sprinkle topping evenly over apricot mixture. Bake at 400º for 30 minutes, until golden brown. Remove from oven and let sit overnight.

Serve topped with a dollop of yogurt. Cover any remaining crisp and refrigerate.

August 2, 2010

Stuffed Peppers (Baked Chiles Rellenos)

 A traditional chile relleno is a poblano pepper stuffed with cheese (or meat or beans), covered in an egg batter and deep fried.  If that is what you are looking for, click here.  But if you're wanting the melt-y cheese factor without the frying, or if you're wanting a make-ahead recipe to use a bumper crop of peppers, read on.

My go-to recipe for a Baked Chile Relleno (or a Stuffed Pepper) is more about the fabulous summer produce than the fried coating and the cheese:  Fresh corn and pepper with just enough Monterey Jack cheese to hold it together and give it a tang.  As with any stuffed-vegetable dish, this is infinitely variable.  My husband likes peppers filled with a mixture of shredded chicken and rice cooked with chorizo.  I hope you will play around with the basic method and find your favorite Baked Chiles Rellenos recipe.

(Baked) Chile Rellenos

Serve as a side to grilled meats, or as a main dish accompanied by frijoles. 
Garnish with sour cream and cilantro, if desired. 
Too hot too heat up the oven in the summer?  No problem.  Set stuffed peppers together seam side up on a large sheet of aluminium foil (or in a disposable foil pan).  Wrap tightly with foil and cook over a medium to medium-hot grill approx 30 minutes, until chiles are hot and cheese is melted.

8 fresh poblano peppers or sweet yellow peppers
canola oil, 1-2 tablespoons
2 cloves garlic, crushed and minced
1/2 a medium red onion, diced finely, about 1 cup
2 ears corn, removed from the cob
2 springs fresh oregano or 1/2 teaspoon Italian seasoning
8 ounces Monterey Jack cheese, cut into logs.

With a sharp knife, cut a slit from the crown almost to the bottom of each pepper.  Set peppers in a large pot with lid.  Pour boiling water over peppers to cover.  Hold peppers under water by weighting them with a salad plate.  Cover pot with lid.   Let sit approximately 20 minutes.  This step softens the peppers for filling without out having to char and peel each one individually. 

Meanwhile, heat oil in large skillet over medium to medium high heat.  Add garlic and onion and a pinch of salt. Sauté, stirring occasionally, until softened, about 5 minutes. Add corn, oregano and salt and pepper to taste and sauté an additional 3 to 5 minutes to bring out the flavor in the corn.

Preheat oven to 400º.

Drain water from peppers.  Let sit until cool enough to handle.  You can speed this process by rinsing the peppers in cold water or by using rubber gloves when handling peppers (which is a good idea when handling spicy peppers anyway).   Carefully insert the blade of a paring knife or a spoon into the slit in the pepper and scrape out seeds.  I find that rinsing under cool water helps the seeds come out.  Try not to tear the flesh of the pepper.

Squeeze top and bottom of pepper to open the slit and stuff it:  First an ounce of cheese, then spoon the onion-corn mixture over the cheese.  Use the spoon or your fingers to pack the stuffing in well. You want to pepper stuffed full, as the filling will cook down just a bit, but you don't want the pepper gaping open.  Set peppers in a greased baking dish, seam side up.

Bake at 400º about 25 minutes, until filling is heated through and cheese is melted.

Make ahead directions:

Peppers can be stuffed and refrigerated unbaked up to 2 days before baking.  Add approximately 5 minutes to baking time.

After baking, peppers can be frozen.  Freeze unwrapped on a baking sheet.  Once frozen, wrap each pepper in a double layer of plastic wrap and freeze up to 2 months.  Remove plastic wrap and microwave one pepper on medium power 2 minutes to defrost, then on high 2 minutes or until heated through.